On this page
A client portal is the difference between a client asking you for a status update and a client finding it themselves. If you want to build a client portal this week, here is what you end up with when it works: your own address on your own domain, a login for each client, a rule that shows every client only their own rows, and an admin view where you see everything. Nothing else in this guide matters until those four things exist. Everything after it is polish.
What a client portal is, and what you end up with
A client portal is an external-facing, login-protected slice of your business data. It is not your project management tool, and it is not your website. It is the one place where the people paying you can see the status of what they bought without asking you.
That distinction decides the whole build. Internal tools serve your team, so they can be ugly and complicated. A portal serves people who did not ask to learn your systems, so it has to answer one question on the first screen: what do I need to do next.
Some teams call the same thing a customer portal, a client area, or a customer hub. The naming does not change the build. What you are shipping is:
- An address. A published URL on your domain, not a shared folder and not a third-party subpath.
- Logins. One identity per client, so the portal can tell who is asking.
- A visibility rule. Each row of data belongs to exactly one client, and the portal enforces that on every read.
- An admin view. The same dataset, seen from your side, without borrowing a client's login.
Prerequisites and expected result
Before you build anything, collect three inputs. If you cannot answer all three, stop and answer them first; each one is a place where portals get rebuilt from scratch.
- The objects your clients care about. Orders, projects, files, invoices, appointments, tickets. These are the nouns the portal will show.
- Where those objects live today. A spreadsheet, an invoicing tool, a CRM, or nothing yet. This decides whether you start in a built-in database or connect something you already run.
- Who may see which row. Your side, their side, and any partner or subcontractor in between.
Expected result: a published portal where two different clients can log in and each sees a different, correct slice of the same dataset.
Out of scope for this guide: regulated-industry compliance review, two-way sync with an ERP or accounting system, and single sign-on policy enforcement. Those are covered in the last section.
Step 1: Decide what each client should see
The first step is not design. It is a table, and writing it is what stops the expensive rework later.
| What your client needs | The module that answers it | How you verify it |
|---|---|---|
| To know where things stand | Status and timeline at the top of the first screen | Log in as a test client and read the answer in five seconds |
| To find the documents they keep asking for | Files, contracts, and deliverables grouped by project | Upload one file as admin and confirm only the owning client sees it |
| To know what they owe | Invoices, payment status, and receipts | Confirm a second client sees a different balance |
| To use what they bought | Seats, entitlements, or account settings | Change a setting as the client and confirm it persists |
| To get unstuck without emailing you | Short FAQ, forms, and support routing | Submit a test request and confirm it lands in your admin view |
Define three roles before you define any page: you (everything), the client (only their rows), and any partner (only the rows you explicitly share). Two of the three are easy to implement and easy to verify. The third one is where permission bugs hide, so decide deliberately whether you need it at all.
If you want client portal examples before you commit, take two from your own book of business: the client who emails you for status, and the client who asks for the same file twice. Those two conversations define the minimum viable portal better than any feature list.
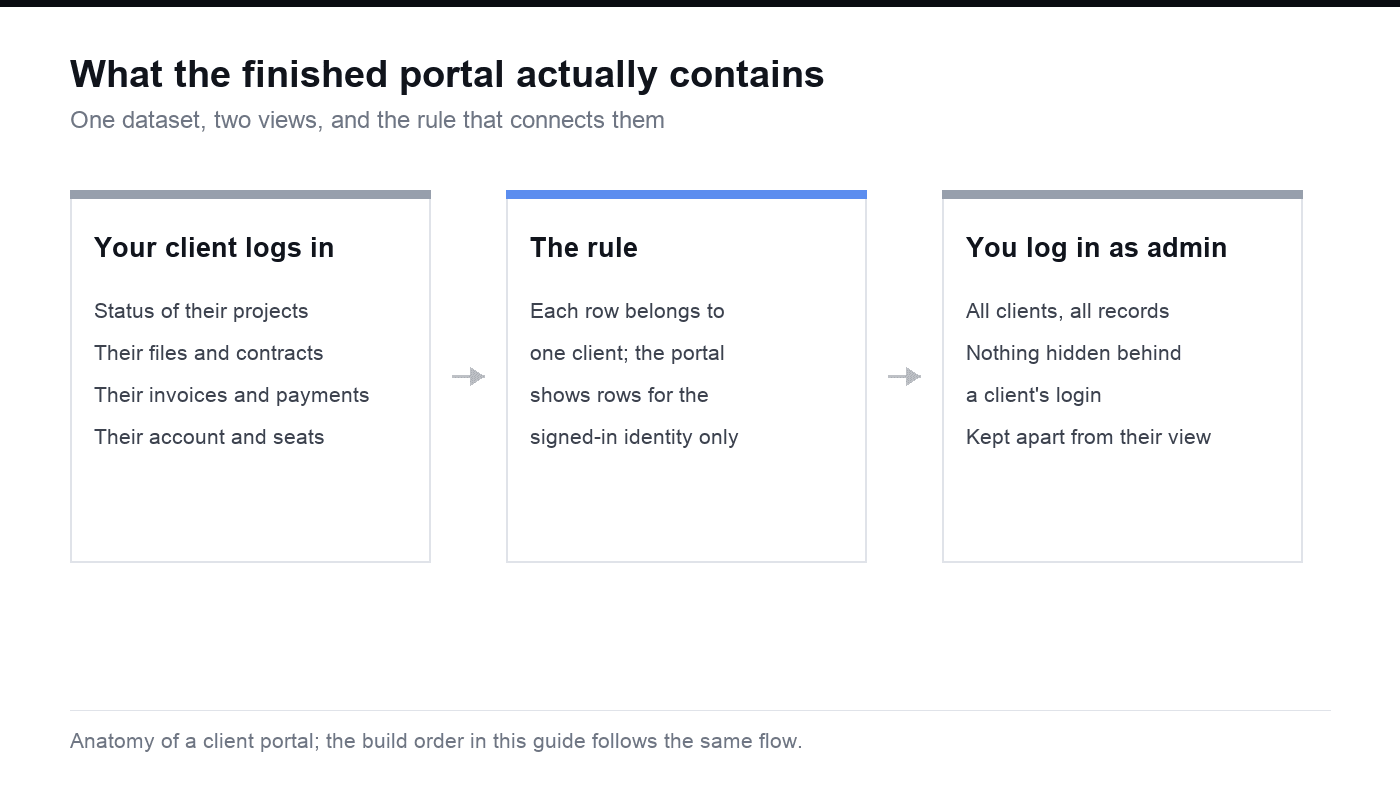
The shape of a finished portal: one dataset, two views, and the rule that connects them.
Step 2: Put the data behind a login
Two separate mechanisms do the work here, and confusing them is the most common way portals leak data.
Authentication identifies the signed-in user. Authorization determines which records and actions that identity may access. Apply the client ownership rule to each request; the current OWASP guidance linked below supports this distinction and request-level permission checks.
So there are two things to check at this step:
- Login is required for every page, not just the home screen. A single unguarded route exposes the same data as no login at all.
- Every read is filtered by identity. The rule belongs to the data layer, not to the page. Hiding a column in the interface is not a permission.
If your data already lives in a database, aim for one query per object that is always scoped to the current client. If it lives in a spreadsheet, migrate it into a real table first; a store of typed rows behind a form is what turns a tracker into an application.
Step 3: Build the client-facing pages
With the rules in place, the page build is short. Four screens cover most portals.
The first screen is status, not navigation. The client wants to know whether anything needs them. Put the current state at the top, then the exception, then the history. Choose the modules that answer the client's current question: project progress, documents, an approval or a support request. Additional modules belong in the first release only when they serve that workflow.
The detail screen holds one project or order. Everything that belongs to that object lives here: timeline, files, messages, payment state. One object per screen keeps the permission rule easy to reason about.
The documents screen is a filtered list. Clients do not browse folders; they search for the thing you sent them. Sort by date, group by project, and make download the primary action.
The billing screen shows state, not history alone. Outstanding, paid, and upcoming is enough. Anything more detailed belongs in your accounting tool.
Step 4: Brand it and publish on your domain
Carry the studio name and visual identity onto the login page, password reset message and empty states. Review the actual published address and its relationship to the public portfolio so the client can recognize the service they are entering.
Three things to finish before you call it built:
- Own the address. Publish on your domain or a subdomain of it.
- Replace every piece of test data. Demo rows in a client's portal cost more trust than a missing feature.
- Write the empty states. "No invoices yet" is a sentence, not a blank panel.
Verify the portal before you invite a client
Two accounts are the only reliable test. Log in as client A in one browser and as client B in another, then walk the list below. If you skip this and invite a real client first, you will discover permission bugs in front of the person paying you.
- Client A sees A's rows on every screen, including detail pages opened by direct link.
- Client B sees B's rows, and A's data appears nowhere, including in search, lists, exports, and error messages.
- A new client with no records yet sees a sensible empty state instead of a blank screen or an error.
- Password reset works end to end on a real mailbox.
- The portal is usable on a phone, since that is where most clients will open it.
- Your admin view is reachable only by your own login, and never from a client session.
Then run one more pass with a person who is not you. Any instruction that needs explaining in the portal is a missing sentence, not a user error.
Connect a public portfolio to a private client workspace
A portfolio website with client portal functionality serves two audiences with different access. Prospects need approved public work and a way to inquire. Existing clients need their own deliverables, requests and decisions. Make the public/private boundary explicit in the data and in the navigation.
Keep selected work, services and a contact route public. Put a visible “Client login” link beside that navigation, but let authentication and authorization decide what the visitor can retrieve. A hidden menu item is insufficient protection for a project detail URL or file download. OWASP's authorization guidance recommends denying access by default and validating permission on every request.
For a fictional design studio, the public portfolio can describe an approved identity project while the private workspace stores the current draft, feedback and approval. The public case study and private project are separate records, even if they describe the same engagement. An approved public image does not grant permission to publish the underlying source files or client comments.
| Studio record | Intended audience | Allowed action | Verification |
|---|---|---|---|
| Approved portfolio case study | Any visitor | Read public summary | Signed-out browser can open it |
| Project draft | Owning client and studio | Read current draft | Other client direct request is denied |
| Revision request | Owning client and studio | Submit and read feedback | Reload preserves the submitted request |
| Internal pricing note | Studio staff | Read and edit | Client request cannot retrieve the field |
| Final deliverable | Owning client and studio | Download approved file | Different client cannot download by copied URL |
Decide how a prospect becomes a client. A contact form should create an inquiry that staff reviews; it should not automatically grant access to a project. Once a relationship is established, an authorized staff member creates the client membership and assigns the correct projects. Do not infer that relationship from a typed company name or a shared email domain.
Move an Excel tracker into the portal without publishing the workbook
An Excel to client portal migration starts with the records the client should see. Export a copy of the relevant data, then decide how each row will be identified and owned. Keep internal worksheets, notes, margins and formulas outside the client-facing import unless you explicitly need them.
The sample below is synthetic. It models two client organizations and three project records; it is a specification and validation fixture, not an already deployed permission system:
Use client_id to join each project to the client organization. Store memberships separately: a user can belong to an organization, and an organization can have several authorized users. Keep project_id stable when the title or status changes. If the workbook has no stable identifier, assign one in the preparation copy and retain the mapping back to its source row.
Before import, check for missing IDs, duplicate project IDs and unknown client IDs. List the accepted status values and reject unexpected values into a correction report. Work on a staging copy so an invalid row cannot leave half a migration in the live portal. Save the accepted-row count and ownership totals, then compare those values after import.
In this fixture, C100 should own P100 and P300; C200 should own P200. A client-facing count of three for either organization is a failed ownership test. Run the same checks through the server's list, detail and export endpoints. Also try a direct request for P200 while signed in as a C100 member. The expected denial should come from the backend, rather than a page filter hiding the row after it has already arrived.
Treat formulas as business rules that need an explicit destination. A workbook may calculate a due date or approval status from other cells. Decide whether the portal calculates that value, imports a fixed snapshot or calls the existing system of record. A CSV export contains cell values rather than a live Excel formula engine. A later workbook update will not reach the portal unless you implement and test an update process.
Choose one owner for ongoing edits. For a first migration, the portal can become the source of truth after a rehearsed cutover. If the workbook remains authoritative, define how imports match stable IDs, which fields may change and how conflicts are reviewed. Re-uploading a new spreadsheet under a new filename is not a synchronization policy.
Use Atoms' AI App Builder to build the specific workflow once the mapping is clear. Ask for a public portfolio, an authenticated client area, a separate staff interface and the ownership tests above. Include the prepared synthetic fixture first. Follow the spreadsheet migration guide when the workbook also contains internal approvals or complex relationships. Verify the generated backend, persistence and file access before inviting clients.
Build a client portal with Atoms
Start with the work a client needs to complete: approve a deliverable, send a missing document, or track a support request. Specify the records, the owning client and the allowed actions before asking for screens. Your first acceptance test is still two client accounts plus an admin account; the interface alone cannot prove access control.
The three examples below use fictional businesses and synthetic records. They are demonstrations you can inspect and adapt, not customer outcome claims. Each case needs its own permission and workflow checks before a real client uses it.
Design agency: Northstar Client Room
A brand client opens the next deliverable, reviews the project timeline and sends an approval or revision request. The agency needs an admin overview across clients; the client needs only their own projects and files.
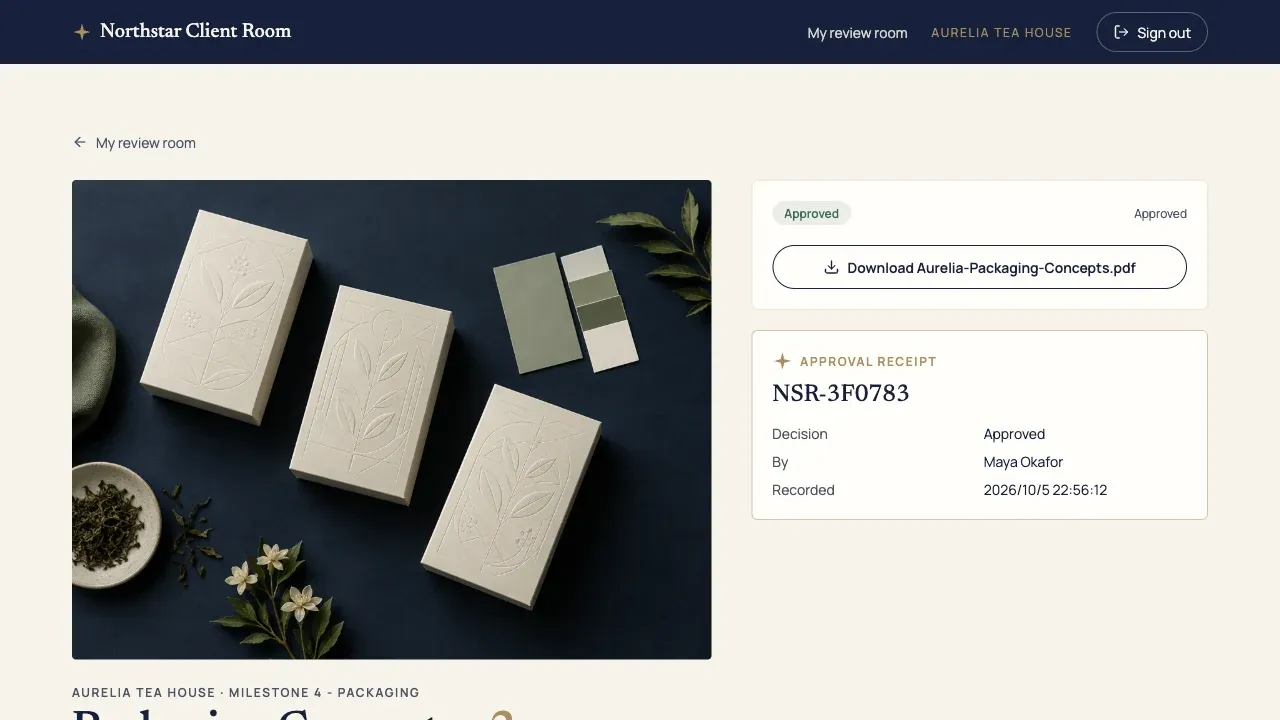
Try the live Northstar Client Room demo · Open this example in Atoms
Try this journey: sign in as client A, open a deliverable and send feedback; reload to check the saved status. Sign in as client B and try A's direct project and file links. Those requests must be denied rather than hidden only in the navigation.
Bookkeeping service: Harbor Ledger Desk
A business owner sees the missing documents for the current close, uploads a synthetic receipt and checks that it was received. The bookkeeping team sees the document queue across both clients.
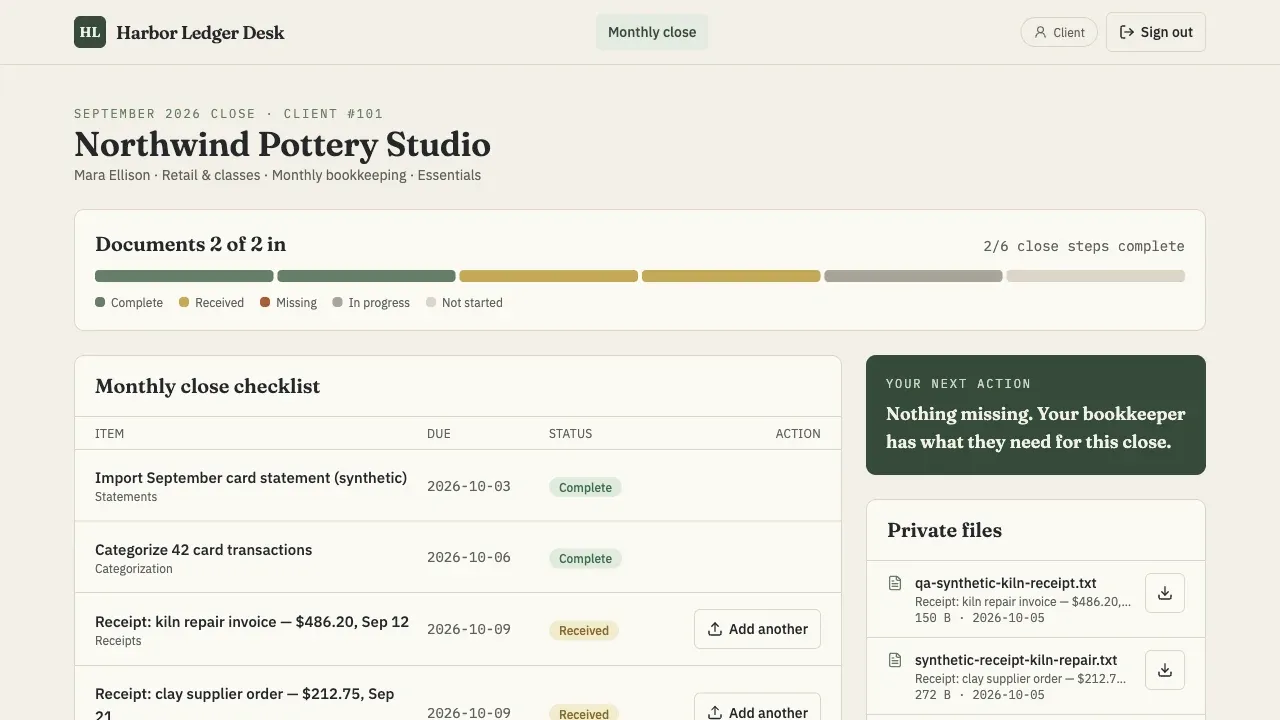
Try the live Harbor Ledger Desk demo · Open this example in Atoms
Try this journey: upload a harmless sample document as one client, reload and check the received record. The other client must not be able to list or download that document. No banking connection or financial advice is implied by this demo.
Managed support: Relay Service Hub
A customer submits a ticket, follows its progress and reads a resolution. The support team assigns the ticket and changes its status without borrowing the customer's login.
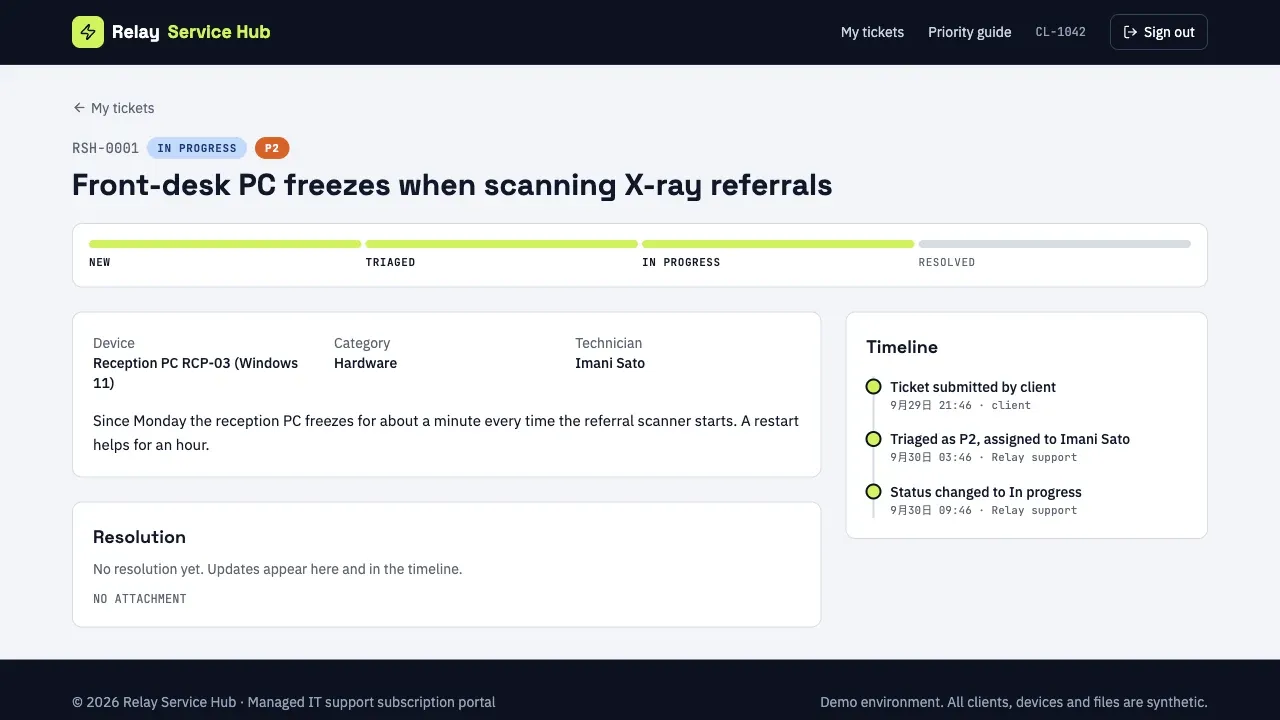
Try the live Relay Service Hub demo · Open this example in Atoms
Try this journey: create a ticket, check its field validation, then update it from the admin view. The saved update must appear after the client reloads, while a second customer cannot read the ticket by ID.
Copy this client portal brief
Replace the bracketed fields with your own workflow. Use synthetic data for the first build.
Build your client portal with Atoms: open the builder section and paste the brief. If your starting data is in a tracking sheet, use the spreadsheet-to-web-app field mapping checklist before the import.
What it costs, and when buying beats building
The money question is not "free versus paid". It is which costs you take on.
| Decision | Build your own portal | Buy a client portal product |
|---|---|---|
| Upfront work | Modelling the data, writing the visibility rule, building four screens | Configuring a template and importing data |
| Ongoing cost | Hosting, maintenance, and your own review of security and data handling | A subscription or licence, with the vendor holding the platform |
| What constrains you | Your own data model, which you can reshape when the business changes | The product's interface and the premises it imposes |
| Where you get stuck | Every edge case is yours to solve | You wait for a feature that may never ship |
| Best fit | The portal must mirror how you actually work | The portal is a standard shape and speed matters more than fit |
Compare the managed product's current requirements with your data model and working environment. Check identity, file access, hosting, export and integration conditions before choosing. A standard portal may meet the task without custom development; a custom build needs a specific workflow advantage and a verified maintenance owner.
When not to build your own portal
Four situations where building is the wrong call, regardless of how cheap the tooling gets.
Regulated data. Health, legal, financial, and education records carry retention, residency, and audit obligations. A vendor that already carries the certifications has done work you would otherwise have to commission.
Two-way sync with a system of record. If the portal must write back into an ERP or accounting package, the integration risk usually exceeds the interface work.
Enterprise access requirements. Mandatory SSO, session policy, and audit logs are procurement blockers, not features you can add later.
A handful of clients, once. If you have three clients and one project each, a well-organised shared drive solves the same problem for less effort. Build the portal when the relationship is long and repeating.
Conclusion
Do one thing today, before you open a builder: write the table of "who may see which row". That single artefact decides your database structure, your pages, and your test plan, and skipping it is why portal projects stall in month two.
Then build the four screens in order, verify with two accounts, and only then send an invitation. Start building in Atoms with the objects, fields, and access rules you just wrote down, review the first version, and publish it on your own domain once the two-account check passes.
Frequently asked questions
01Q1: How long does it take to build a client portal?
It depends on the data, not the interface. Four screens are quick once the objects and access rules are settled; the time goes into moving your records into a real table and defining who may see which row. This guide deliberately gives an order and a verification list instead of a time promise, because the failure mode is rework, not the initial build.
02Q2: Do I need to know how to code to build a client portal?
Not necessarily. What the work actually requires is modelling, not syntax: naming your objects, listing their fields, and deciding the visibility rule. Where coding still enters is integration with a system you already run.
03Q3: What is the difference between a client portal and a customer portal?
Nothing technical. Client portal is the term agencies and professional services use, customer portal is the term product companies use. The build is identical: login, per-identity data access, documents, status, and billing.
04Q4: Where should the data for a client portal live?
In a real database, not in a spreadsheet that the portal reads live. Typed rows with field definitions give you validation, defaults, and the ability to scope every query to one client. If your data already lives in an application, connect it instead of copying it, and keep the permission rule in one place.
05Q5: Can I build a client portal without hiring a developer?
Yes, if the portal fits a shape a tool already supports. The clearing condition is unusual access rules: once one project must be shared with a client and a subcontractor while other rows stay private, you need a platform where permissions are data-driven. That is now a normal capability rather than a custom project.
06Q6: How do I stop one client from seeing another client's data?
Make every read depend on the signed-in identity, at the query level, and never rely on hiding elements in the interface. Then verify with two accounts: log in as each client, try to open the other client's records by direct link, and check lists, search, exports, and error messages. If a single page bypasses the rule, the whole portal is exposed.
07Q7: How much does it cost to build and run a client portal?
There is no honest single number, because the cost is a shape rather than a price. Building shifts spend into your own work: modelling, building, plus ongoing hosting, maintenance, and review of security and data handling. Buying converts that into a subscription or licence and hands the platform to a vendor, at the cost of fitting their interface. This article quotes no vendor prices, since those change and depend on plan terms you should read on the vendor's own page.
